Wednesday, 11 December 2013

Configuring an external NTP source on Windows 2003 domain controllers

Before I perform any Active Directory upgrade, I always run the Microsoft IT environment health scanner. This tool was written by Microsoft to aid customer moving to Essential Business Server, no long dead. It's still a great tool for assessing the health of the existing Active Directory.
One of the most common issues found the time configuration on 2003 domain controllers.


To address this issue you must set these two registry entries on the PDC emulator.

Windows Registry Editor Version 5.00
[HKEY_LOCAL_MACHINE\SYSTEM\CurrentControlSet\Services\W32Time\Config]
"MaxNegPhaseCorrection"=dword:0002a300
"MaxPosPhaseCorrection"=dword:0002a300

[HKEY_LOCAL_MACHINE\SYSTEM\CurrentControlSet\Services\W32Time\TimeProviders\NtpClient]
"SpecialPollInterval"=dword:00000384

And issue these two commands at CMD prompt.

w32tm /config /manualpeerlist:"0.pool.ntp.org 1.pool.ntp.org" /syncfromflags:manual /reliable:yes /update
net stop w32time && net start w32time
w32tm /resync

Tuesday, 10 December 2013

Patching Windows 2012 Hyper-V 3.0

For a reason unknown to me Microsoft has a number of hotfixes that fix some nasty bugs in Hyper-V 3.0 but aren't' downloaded via Windows update.

Christian Edwards wrote a Technet blog was written to scan for the missing patches a while back, but it was a ball-ache obtaining the individual patches.

http://blogs.technet.com/b/cedward/archive/2013/05/24/validating-hyper-v-2012-and-failover-clustering-2012-hotfixes-and-updates-with-powershell.aspx

Some clever dude has written a PowerShell script to scan the cluster for missing patches, and download them using BITS for your convenience.

https://github.com/it-praktyk/Get-WindowsHotfixes

Tuesday, 3 December 2013

VMware and ESXi with 4k Disks

EqualLogic firmware 7.0.0 now gives us the option to create volumes with 4k sectors rather than the legacy 512e sector size. I thought it would be interesting to create two EqualLogic volumes, one 4k, one 512e. Then create to VMs and IO meter to see if there are any performance gains.


The two volumes could be seen by the ESXi 5.5 host but 

I am surprised that considering 4096 byte sectors have been around since 2010 that VMware has no compatibility for this disk format.

To conclude:

ESXi + 4K disks = :(


Microsoft suggestions for transitioning away from SBS2011

http://blogs.technet.com/b/infratalks/archive/2013/09/04/transition-from-sbs2011-to-server-2012-the-essentials-route.aspx

http://blogs.technet.com/b/infratalks/archive/2012/09/07/transition-from-small-business-server-to-standard-windows-server.aspx

Monday, 2 December 2013

VMware KB: Tuning ESX/ESXi for better storage performance by modifying the maximum I/O block size

VMware KB: Tuning ESX/ESXi for better storage performance by modifying the maximum I/O block size

Updating Dell 12G BIOS from the Dell BIOS update utility.

Updating BIOS firmware on Dell servers with ESXi can be tricky. If you are thinking this guy needs to meet the life-cycle controller, your wrong. The Life-cycle controller looks at an old Dell repository.  For Example, at the time of writing I know Dell have released BIOS 2.1.2 it's available from the support.euro.dell.com website but the Life-cycle controller shows no new updates. With a Windows OpSys you can just download the .EXE updater and reboot. With ESXi this is not available.

Here is a solution:

Download the .efi file from the support website and copy it to the root of a USB stick.


I use the iDRAC to perform the update, but you insert the USB stick directly into the server and do this from the server console.
Launch the iDRAC console and click the virtual media menu, select the USB stick, in the example below, E drive.


During boot press F11 for the BIO boot manager. Once in the boot manager select. System Utilities.


At the next screen select BIO file explorer.


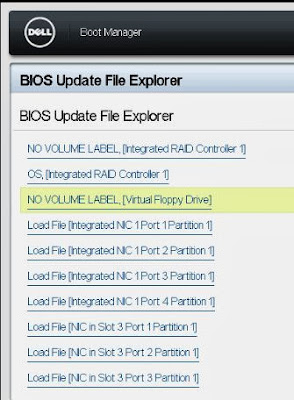
You then need to locate the device with the .efi file. This should be the virtual floppy drive.


After the file explorer has discovered the efi file you need to select it.


Confirm the firmware upgrade and select Continue BIOS Update.


The BIOS update is executed as you can see below.


This is a great way to update the BIOS from the comfort of your chair.