Wednesday, 26 September 2012

Tuesday, 25 September 2012
Troubleshooting excessive I/O on a LUN in VMware
If you notice a lot of I/O being generated on a particular LUN. How do you figure out who / what is causing this? Well it is not as difficult as you think it would be…
- Open up esxtop
- Go to the “Device” view (U)
- Find the device which is causing a lot of I/O
- Press “e” and enter the “Device ID” in my case that is an NAA identifier so “copy+paste” is easiest here
- Now look up the World ID under the “path/world/partition” column
- Go back to CPU and sort on %USED (press “U”)
- Expand (press “e”) the world that is consuming a lot of CPU, as CPU is needed to drive I/O
Friday, 17 August 2012
EqualLogic Auto-Snapshot Manager Agent fails to start
EqualLogic Auto-Snapshot Manager Agent fails to start on Windows hosts that are not connected to the internet. This happens because the Host Intergration Toolkit 4.0 uses .NET 2.0.
Each time a .NET application starts, it tries to check revoked certificates at crl.microsoft.com because the server has no internet access the service times out while waiting.
The solution is to increase the ServicePipesTimeout value in the registry.
This can also be caused if the installation of the HIT 4.0 fails to install the Microsoft MPIO feature. The solution is to uninstall the HIT, reboot, manually install the MPIO feature and then install the HIT again.
see support.microsoft.com/kb/824344 for further reading.
Each time a .NET application starts, it tries to check revoked certificates at crl.microsoft.com because the server has no internet access the service times out while waiting.
The solution is to increase the ServicePipesTimeout value in the registry.
The Service Control Manager will generate an event if a service does not respond within the defined timeout period (the default timeout period is 30000 milliseconds). To resolve this problem, use the Registry Editor to change the default timeout value for all services.
- In the Registry Editor, click the registry subkeyHKEY_LOCAL_MACHINE\SYSTEM\CurrentControlSet\Control
- In the details pane, locate the ServicesPipeTimeout entry, right-click that entry and then select Modify.Note: If the ServicesPipeTimeout entry does not exist, you must create it by selecting New on the Edit menu, followed by the DWORD Value, then typing ServicesPipeTimeout, and clicking Enter.
- Click Decimal, enter the new timeout value in milliseconds (I prefer 120000), and then click OK.
- Restart the computer.
This can also be caused if the installation of the HIT 4.0 fails to install the Microsoft MPIO feature. The solution is to uninstall the HIT, reboot, manually install the MPIO feature and then install the HIT again.
see support.microsoft.com/kb/824344 for further reading.
Wednesday, 1 August 2012
Converging 10GbE and 1GbE networks with Force 10 and Dell PowerConnect
Customers are now moving from 1GbE iSCSI storage to 10GbE. This introduces a new challenge of converging 1 and 10 networks. In this situation the customer has two existing EqualLogic 1GbE Arrays connected to a pair of Dell PowerConnect 5424 switches, these switches where joined together via a 2Gb LAG. The customer has purchased two new 10Gb Arrays and a pair of Dell Force 10 s4810 switches, but needs to have a period where the existing ESXi servers need to continue accessing the array.
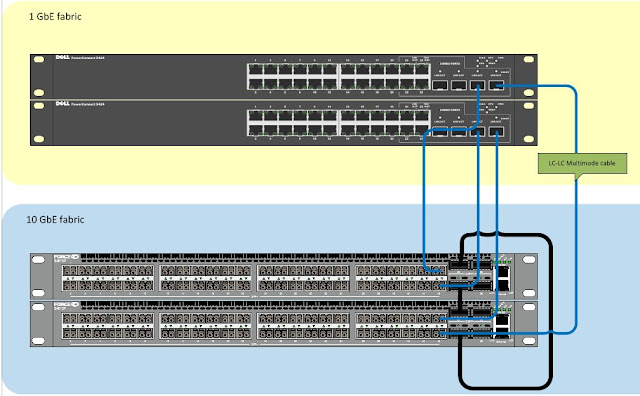
The end solution:

Parts required:
4 x PowerConnect SFP Transceivers, Dell part number 0HHM9W
4 x Force10 SFP Transceivers, Dell part number 0GF76J
4 x LC-LC Multi-mode Optical Cables, depicted in blue above.
Twin-axe cables from the s4810 ports to the SFP combo ports do not work!! The answer is to use a Or if you are using PowerConnect 62xx series you need to use:
Twin-axe cables from the s4810 ports to the SFP combo ports do not work!! The answer is to use a Or if you are using PowerConnect 62xx series you need to use:
1 x Dell PowerConnect 622xx/M6220 Dual Port SFP+ module, Dell Part number 409-10135
2x 10GbE SFP+ Direct Attach copper cable 5M-KIT (Either or) Dell Part number 470-12823
2x 10GbE SFP+ Direct Attach copper cable 2M-KIT (Either or) Dell Part number 470-12822
2x 10GbE SFP+ Direct Attach copper cable 5M-KIT (Either or) Dell Part number 470-12823
2x 10GbE SFP+ Direct Attach copper cable 2M-KIT (Either or) Dell Part number 470-12822
Configuration on both PowerConnect switches:
Break the 2 port LAG between the PowerConnects, insert the SFP modules into to SFP ports 23 and 24 making sure the shared Ethernet ports aren't in use!
#conf
(config)#interface port-channel 1
(config)#desc Force10-link
(config)#port jumbo-frame
(config)#flowcontrol on
(config)#switchport mode trunk
(config)#switchport trunk allowed vlan add 100 (the iSCSI vlan)
#exit
#conf
(config)#internet range ethernet g23-24
(config)#channel-group 1 mode on (Must be ON not auto/active)
On the Force10 switches, update the firmware, stack the switches and issue these commands to create two port channels, two are required because the PowerConnect 5424's can't be stacked:
!
interface Port-channel 1
description "LAG to bottom 5424"
no ip address
mtu 12000
switchport
channel-member TenGigabitEthernet 0/46
channel-member TenGigabitEthernet 1/46
no shutdown
!
interface Port-channel 2
description "LAG to top 5424"
no ip address
mtu 12000
switchport
channel-member TenGigabitEthernet 0/47
channel-member TenGigabitEthernet 1/47
no shutdown
!
Now that the LAG between the 5424 switches and the F10's has been created we need to tell the VLANs that the traffic can pass across the LAG. The Force 10 was configured with two VLANs to match the 5424's, vlan 100 for iSCSI and vlan 101 for vMotion. The lines in bold are in important ones.
!
interface Vlan 100
description iSCSI
name iSCSI
ip address 192.168.10.251/24
tagged Port-channel 1-2
untagged TenGigabitEthernet 0/0-23 (top switch)
untagged TenGigabitEthernet 1/0-23 (bottom switch)
no shutdown
!
interface Vlan 101
description vMotion
name vMotion
ip address 192.168.11.251/24
tagged Port-channel 1-2
untagged TenGigabitEthernet 0/24-31
untagged TenGigabitEthernet 1/24-31
no shutdown
!
Test the LAG by pinging IP addresses on both sets of switches. Don't forget to copy the running-config to startup-config on all the switches. As a note the LAG did not work the first time , I had to remove the channel members with these commands:
no channel-member TenGigabitEthernet 0/46
no channel-member TenGigabitEthernet 0/47
no channel-member TenGigabitEthernet 1/46
no channel-member TenGigabitEthernet 1/47
Once I re-added the ports back the LAG sprang into life! Dell tech said they had seen this before!
Friday, 13 July 2012
Plug N Play errors after firmware updates
After using the Life-cycle controller on a Dell R710 I got this error. Also the server would not boot as it could not find the RAID controller.

The fix was to disable the ROM option, highlighted below for all non on-board Broadcom NICs. In my case there where eight to configure as there where 2 quad port PCI-e cards.

Tuesday, 26 June 2012
iSCSI Throughput and SMB signing
Here is an interesting article on the effects of SBM signing on iSCSI targets.

Basically it involves, disabling SMB signing on client and server communications to speed up network throughput.
http://www.thatcouldbeaproblem.com/?p=72

http://www.thatcouldbeaproblem.com/?p=72
Monday, 28 May 2012
Remove the Exchange 2010 default Mailbox store
The First database contains the SystemMailboxes which are the Arbitration mailbox(es).
We have to move these system mailboxes to another database before of remove the Default Database.
1. Find the Arbitration Mailbox using the Exchange MAnagement Shell (EMS):
Get-Mailbox | Where {$_.Name -like "Discovery*" } | ft Name
You might need to move the Federation Mailbox also...
Get-Mailbox -Arbitration | ft Name
2. Now create a new move request in order to move the system mailboxes to another mailbox database:
New-MoveRequest -Identity "SystemMailbox{yourGUID}" -TargetDatabase "dbxxxx"
New-MoveRequest -Identity "DiscoverySearchMailbox{yourGUID}" -TargetDatabase "dbxxxx"
New-MoveRequest -Identity "FederatedMail{yourGUID}" -TargetDatabase "dbxxxx"
3. Verify whether the move request completed:
Get-MoveRequest
4. Now remove the move request
Or clear the lot...Remove-MoveRequest -Identity "the name of the request like Microsoft Exchange Approval Assistant"
Edit: For Exchange 2016 you can use these commands:Get-MoveRequest | Remove-MoveRequest
Get-Mailbox -Arbitration | New-MoveRequest -TargetDatabase "dbxxxxxxx"
Get-Mailbox | Where {$_.Name -like "Discovery*" } | New-MoveRequest -TargetDatabase "dbxxxxxxx"
Get-Mailbox -Database "Mailbox Database Old" -AuditLog | New-MoveRequest -TargetDatabase "dbxxxxxxx"
Get-Mailbox -Database "Mailbox Database Old" | New-MoveRequest -TargetDatabase "dbxxxxxxx"
Subscribe to:
Posts (Atom)