Wednesday, 11 December 2013

Configuring an external NTP source on Windows 2003 domain controllers

Before I perform any Active Directory upgrade, I always run the Microsoft IT environment health scanner. This tool was written by Microsoft to aid customer moving to Essential Business Server, no long dead. It's still a great tool for assessing the health of the existing Active Directory.
One of the most common issues found the time configuration on 2003 domain controllers.


To address this issue you must set these two registry entries on the PDC emulator.

Windows Registry Editor Version 5.00
[HKEY_LOCAL_MACHINE\SYSTEM\CurrentControlSet\Services\W32Time\Config]
"MaxNegPhaseCorrection"=dword:0002a300
"MaxPosPhaseCorrection"=dword:0002a300

[HKEY_LOCAL_MACHINE\SYSTEM\CurrentControlSet\Services\W32Time\TimeProviders\NtpClient]
"SpecialPollInterval"=dword:00000384

And issue these two commands at CMD prompt.

w32tm /config /manualpeerlist:"0.pool.ntp.org 1.pool.ntp.org" /syncfromflags:manual /reliable:yes /update
net stop w32time && net start w32time
w32tm /resync

Tuesday, 10 December 2013

Patching Windows 2012 Hyper-V 3.0

For a reason unknown to me Microsoft has a number of hotfixes that fix some nasty bugs in Hyper-V 3.0 but aren't' downloaded via Windows update.

Christian Edwards wrote a Technet blog was written to scan for the missing patches a while back, but it was a ball-ache obtaining the individual patches.

http://blogs.technet.com/b/cedward/archive/2013/05/24/validating-hyper-v-2012-and-failover-clustering-2012-hotfixes-and-updates-with-powershell.aspx

Some clever dude has written a PowerShell script to scan the cluster for missing patches, and download them using BITS for your convenience.

https://github.com/it-praktyk/Get-WindowsHotfixes

Tuesday, 3 December 2013

VMware and ESXi with 4k Disks

EqualLogic firmware 7.0.0 now gives us the option to create volumes with 4k sectors rather than the legacy 512e sector size. I thought it would be interesting to create two EqualLogic volumes, one 4k, one 512e. Then create to VMs and IO meter to see if there are any performance gains.


The two volumes could be seen by the ESXi 5.5 host but 

I am surprised that considering 4096 byte sectors have been around since 2010 that VMware has no compatibility for this disk format.

To conclude:

ESXi + 4K disks = :(


Microsoft suggestions for transitioning away from SBS2011

http://blogs.technet.com/b/infratalks/archive/2013/09/04/transition-from-sbs2011-to-server-2012-the-essentials-route.aspx

http://blogs.technet.com/b/infratalks/archive/2012/09/07/transition-from-small-business-server-to-standard-windows-server.aspx

Monday, 2 December 2013

VMware KB: Tuning ESX/ESXi for better storage performance by modifying the maximum I/O block size

VMware KB: Tuning ESX/ESXi for better storage performance by modifying the maximum I/O block size

Updating Dell 12G BIOS from the Dell BIOS update utility.

Updating BIOS firmware on Dell servers with ESXi can be tricky. If you are thinking this guy needs to meet the life-cycle controller, your wrong. The Life-cycle controller looks at an old Dell repository.  For Example, at the time of writing I know Dell have released BIOS 2.1.2 it's available from the support.euro.dell.com website but the Life-cycle controller shows no new updates. With a Windows OpSys you can just download the .EXE updater and reboot. With ESXi this is not available.

Here is a solution:

Download the .efi file from the support website and copy it to the root of a USB stick.


I use the iDRAC to perform the update, but you insert the USB stick directly into the server and do this from the server console.
Launch the iDRAC console and click the virtual media menu, select the USB stick, in the example below, E drive.


During boot press F11 for the BIO boot manager. Once in the boot manager select. System Utilities.


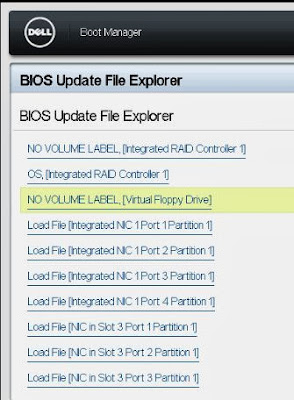
At the next screen select BIO file explorer.


You then need to locate the device with the .efi file. This should be the virtual floppy drive.


After the file explorer has discovered the efi file you need to select it.


Confirm the firmware upgrade and select Continue BIOS Update.


The BIOS update is executed as you can see below.


This is a great way to update the BIOS from the comfort of your chair.

Thursday, 21 November 2013

Active Directory Health Check script

This handy script can be used to check the health of your active directory.

@echo off
del c:\ADHealth.txt

echo ________________________________ >> c:\ADHealth.txt
echo Domain Controllers In the Domain >> c:\ADHealth.txt
echo ________________________________ >> c:\ADHealth.txt
C:\Windows\System32\DSQUERY Server -o rdn >> c:\ADHealth.txt
echo _________________ >> c:\ADHealth.txt
echo FSMO role holders >> c:\ADHealth.txt
echo _________________ >> c:\ADHealth.txt
C:\Windows\System32\netdom query fsmo >> c:\ADHealth.txt
echo ______________________ >> c:\ADHealth.txt
echo Repadmin - Syncall - e >> c:\ADHealth.txt
echo ______________________ >> c:\ADHealth.txt
C:\Windows\System32\repadmin.exe /syncall /e >> c:\ADHealth.txt
echo ______________________ >> c:\ADHealth.txt
echo Repadmin - Syncall - a >> c:\ADHealth.txt
echo ______________________ >> c:\ADHealth.txt
C:\Windows\System32\repadmin.exe /syncall /A >> c:\ADHealth.txt
echo ______________________ >> c:\ADHealth.txt
echo Repadmin - Syncall - d >> c:\ADHealth.txt
echo ______________________ >> c:\ADHealth.txt
C:\Windows\System32\repadmin.exe /syncall /d >> c:\ADHealth.txt
echo ______________________ >> c:\ADHealth.txt
echo Repadmin - Replsummary >> c:\ADHealth.txt
echo ______________________ >> c:\ADHealth.txt
C:\Windows\System32\repadmin.exe /replsummary * >> c:\ADHealth.txt
echo ______________ >> c:\ADHealth.txt
echo Repadmin - KCC >> c:\ADHealth.txt
echo ______________ >> c:\ADHealth.txt
C:\Windows\System32\repadmin.exe /kcc * >> c:\ADHealth.txt
echo _____________________ >> c:\ADHealth.txt
echo Repadmin - showbackup >> c:\ADHealth.txt
echo _____________________ >> c:\ADHealth.txt
C:\Windows\System32\repadmin.exe /showbackup * >> c:\ADHealth.txt
echo ___________________ >> c:\ADHealth.txt
echo Repadmin - Showrepl >> c:\ADHealth.txt
echo ___________________ >> c:\ADHealth.txt
C:\Windows\System32\repadmin.exe /showrepl *  >> c:\ADHealth.txt
echo ________________ >> c:\ADHealth.txt
echo Repadmin - Queue >> c:\ADHealth.txt
echo ________________ >> c:\ADHealth.txt
C:\Windows\System32\repadmin.exe /queue *  >> c:\ADHealth.txt
echo ______________________ >> c:\ADHealth.txt
echo Repadmin - Bridgeheads >> c:\ADHealth.txt
echo ______________________ >> c:\ADHealth.txt
C:\Windows\System32\repadmin.exe /bridgeheads * /verbose >> c:\ADHealth.txt
echo _______________ >> c:\ADHealth.txt
echo Repadmin - ISTG >> c:\ADHealth.txt
echo _______________ >> c:\ADHealth.txt
C:\Windows\System32\repadmin.exe /istg * /verbose >> c:\ADHealth.txt
echo _______________________ >> c:\ADHealth.txt
echo Repadmin - Showoutcalls >> c:\ADHealth.txt
echo _______________________ >> c:\ADHealth.txt
C:\Windows\System32\repadmin.exe /showoutcalls * >> c:\ADHealth.txt
echo ____________________ >> c:\ADHealth.txt
echo Repadmin - Failcache >> c:\ADHealth.txt
echo ____________________ >> c:\ADHealth.txt
C:\Windows\System32\repadmin.exe /failcache * >> c:\ADHealth.txt
echo ____________________ >> c:\ADHealth.txt
echo Repadmin - Showtrust >> c:\ADHealth.txt
echo ____________________ >> c:\ADHealth.txt
C:\Windows\System32\repadmin.exe /showtrust * >> c:\ADHealth.txt
echo _______________ >> c:\ADHealth.txt
echo Repadmin - Bind >> c:\ADHealth.txt
echo _______________ >> c:\ADHealth.txt
C:\Windows\System32\repadmin.exe /bind * >> c:\ADHealth.txt
echo ______ >> c:\ADHealth.txt
echo Dcdiag >> c:\ADHealth.txt
echo ______ >> c:\ADHealth.txt
C:\Windows\System32\dcdiag /c /e /v >> c:\ADHealth.txt
start c:\ADHealth.txt

Tuesday, 19 November 2013

VMware Standalone Converter 5.5 fails conversion with vim.fault.NonAuthenitcated

During an overnight conversion of a large virtual machine from an old ESX 3.0.2 server to a new ESXi 5.5 server. The conversion failed at 19% with error vim.fault.NonAuthenitcated


After some googling, not much showed up. Took a flyer and retired the job, it completed!!

If at first you don't succeed, try , try and try again. :)

Thursday, 24 October 2013

Adobe flash on Windows server 2012

To get flash to work on Windows server 2012 you need to enable the desktop experience. The instruction on the Adobe website discuss disabling ActiveX filtering, but this is for Windows 8.

import-module ServerManager
Add-WindowsFeature -name Desktop-Experience,qWave ` -IncludeAllSubFeature -IncludeManagementTools

Thursday, 3 October 2013

Resetting the VMware ESXi trial period

Sometimes I am asked to build a vSphere environment on a trial license from VMware. By default this is 60 days. However after building the environment, updating and testing the trial period will have dropped a number of days. The customer rightly pointed out that this has reduced their trail of the product.

You can use this command at the ESXi shell to reset the trail period back to 60 days.

rm -r /etc/vmware/license.cfg
cp /etc/vmware/.#license.cfg /etc/vmware/license.cfg
/etc/init.d/vpxa restart

Tuesday, 10 September 2013

Check Hyper-V replica status across the cluster

If you would like to check the replication status of all the VMs across your cluster you can use this PwerShell command.

get-clusternode | ForEach-Object  {Invoke-command -computername $_.name -scriptblock {get-VMReplication}} | ft name, State, Health, PrimaryServer

Tuesday, 23 July 2013

Dell M1000e IOM firmware fails from CMC GUI

When trying to update the IOM firmware from the CMC GUI you see the error below. I tried pulling the standby CMC and vice-versa but this did not work either.


Fix:

Connect to the CMC management IP address via putty over SSH, and issue this command.

racadm fwupdate -s -m all

This should list all the modules that require a firmware update.

racadm fwupdate -u -m iominf-1

The command above will update the IOM is A1, so you will need to repeat this if you have more IOMs, changing the last digit. Be warned this command will reboot the switch!


Friday, 19 July 2013

Updating firmware on Force10 MXL Blade IOM

Attach to the switch via a console cable, or the CMC backdoor. Start TFTP on your PC with the firmware in the TFTP root.

Show system brief or show os-version
Conf
Int management 0/0
ip address 1.2.3.4 /24
no shutdown
exit
upgrade system tftp://1.2.3.1/FTOS-XL-8.3.16.4.bin A:
wr
reload
show os-version

Tuesday, 25 June 2013

Migrating public folders from Exchange 2007 / 2010 to another Exchange 2010 server

If you need to migrate to a new Exchange 2010 server; Either from Exchange 2007 or from an old Exchange 2010 installation, for example SBS 2011, you will need to move all the public folders to the new server. 

In this example there are two servers:

new-server and old-server

The first task to complete is to see what public folders are located on the old-server. To do that open the Exchange PowerShell as Administrator and enter:

Get-PublicFolderStatistics | Sort-Object -Descending ItemCount |ft -AutoSize

This gives us an idea of how many public folders there are and the item count. If you run the command on the new-server is should return only one result which is the NON_IPM_Subtree.

On the new-server open the Exchange PowerShell as Administrator and enter:

cd $exscripts


.\AddReplicaToPFRecursive.ps1 -TopPublicFolder “\” -ServerToAdd new-server
.\AddReplicaToPFRecursive.ps1 -TopPublicFolder “\NON_IPM_SUBTREE” -ServerToAdd new-server
This tells the old-server to add the new-server to it's list of servers to replicate public folders to for both System folder and User public folders.

Still on the new server run these commands to check that the new-server will take replicas from the old-server.

Get-PublicFolder \ -Recurse | ft name,parentpath,replicas
Get-PublicFolder \NON_IPM_Subtree -Recurse | ft name,parentpath,replicas

Still on the old-server, we can now tell the old-server to move all it's replicas to the new-server via this PowerShell script:

./MoveAllReplicas.ps1 -Server old-server -NewServer new-server

On the new-server we should be able to see the public folder item count increasing. This can take some time to complete.

Get-PublicFolderStatistics | Sort-Object -Descending ItemCount |ft -AutoSize

Because this was originally a migration from Exchange 2003 to 2010 the 'servers' container was still present in ADSIEDIT.MSC which needed removing to prevent replication back-fill from failing.

Hyper-V LiveMigration fails with Live migration did not succeed at the source

I built a Hyper-V 3.0 cluster for a customer moving away from SBS 2011. The cluster was created successfully but live migration was failing with these errors:

"Live migration did not succeed at the source"

"Failed to authenticate the remote node: The specified target is unknown or unreachable (0x80090303)"

The cluster validated without a problem. All the sources were pointing to a mismatch in Hyper-V Network name and vSwitch name. I knew this wasn't the issue as I have used the same PowerShell script to create the network team and vSwitch.

When i looked in the Event Viewer at the Hyper-V-VMMS log I could see the the SPN was not able to register on the SBS 2011 domain controller.


When I used SETSPN -L Hyper-V-node I could see that the Hyper-V SPNs were missing.  I checked the permissions on each node to make sure that 'SELF' has the permission "Validated write to service principal name" but that was correctly set.

I saw on forums that others with a SBS 2011 domain had the same issue. In the end, I worked around the issue by manually adding the required Hyper-V SPNs in AD.

Below are the correct SPNs for Hyper-V 3.0:

Microsoft Virtual Console Service/Hyper-V-node
Microsoft Virtual Console Service/Hyper-V-node.domain.local
Microsoft Virtual System Migration Service/Hyper-V-node
Microsoft Virtual System Migration Service/Hyper-V-node.domain.local
Hyper-V Replica Service/Hyper-V-node
Hyper-V Replica Service/Hyper-V-node.domain.local

After adding the SPNs for both cluster nodes manually on each computer object in DSA.MSC the Live Migration started working :) I did see that the Event ID 14050 were still appearing :( Later in the project a new Windows 2012 DC was added and the 14050 events stopped.

I can only guess this is an issue with the bespoke permissions/policies that Microsoft have built into the SBS solution. This will be an issue moving forward as companies move away from SBS now M$ has killed it off.

http://social.technet.microsoft.com/Forums/windowsserver/en-US/2b80845a-94de-4fc4-8963-ac8e7b41fca6/server-2008-r2-hyperv-live-migration-did-not-succeed-at-the-source-vmname-failed-to-migrate 

Thursday, 20 June 2013

How to determine the current Active Directory or Exchange Server schema version

To check the forest schema version:

dsquery * cn=schema,cn=configuration,dc=domain,dc=local -scope base -attr objectVersion

The command prompt will return the Schema version:
56 = Windows Server 2012
47 = Windows Server 2008 R2
44 = Windows Server 2008
31 = Windows Server 2003 R2
30 = Windows Server 2003
13 = Windows 2000

To check the domain schema version:

dsquery * cn=ActiveDirectoryUpdate,cn=DomainUpdates,cn=System,dc=domain,dc=local -scope base -attr revision

The command will return the revision of the Active Directory update:
9 = Windows Server 2012
5 = Windows Server 2008R2
3 = Windows Server 2008


To check the exchange schema version:

dsquery * CN=ms-Exch-Schema-Version-Pt,cn=schema,cn=configuration,dc=domain,dc=local -scope base -attr rangeUpper


Taken from http://support.microsoft.com/kb/556086

Tuesday, 18 June 2013

Error "Windows cannot access the installation sources. Verify that the installation sources are accessible, and restart the installation"

It's logical to assume that when you build Hyper-V virtual machines to use the Windows media that came shipped with the hardware??

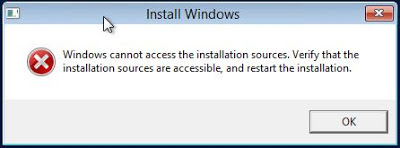
The VM boots from the either the ISO or the DVD media fine, but then issues this error:

"Windows cannot access the installation sources. Verify that the installation sources are accessible, and restart the installation"


Luckily I also had a non OEM copy of 2012, which works a treat!!  Looks like you can't use Dell OEM media to build virtual machines.

If you don't have a copy, you will need to download it from the volume licensing center https://www.microsoft.com/Licensing/servicecenter/default.aspx or apply for the Windows 2012 server trial.

This can also be caused by a damaged or corrupt VHX/VHDX


Tuesday, 11 June 2013

Creating a LAG between Dell PowerConnect 6224 and Cisco 2960S

Creating a LAG between two switch for redundancy and bandwidth is normally not very complicated. I need to create a LAG between a stack of Dell PowerConnect 6224s and a single Cisco 2960-S. I had already created a LAG between the 6224 stack and a 3750-X stack with out any trouble. 

I setup the LAG on the 6224 stack with:

interface range ethernet 1/g24,2/g24
channel-group 24 mode auto

And on the Cisco 2960-S:

Interface range gi1/0/47,gi1/0/48
channel-group 1 mode active

The LAG would be active for a few moment then one of the 2960-S ports would turn orange, with interface status 'err-disabled'
I thought maybe spanning tree was blocking the ports, but this was not the case:

show spanning-tree blocked-ports

Further troubleshooting, I set both of the channel groups to static LAG thinking it might not be negotiating LACP correctly:

 Dell 6224 stack:

interface range ethernet 1/g24,2/g24
channel-group 24 mode on

Cisco 2960-S:

Interface range gi1/0/47,gi1/0/48
channel-group 1 mode on

The LAG was still taking a dive :(

Troubleshooting, etherchannel debugging was enabled on the Cisco
Cisco 2960-S:

debug etherchannel 
Interface range gi1/0/47,gi1/0/48
shutdown
no shutdown

With debugging enabled we could see that the 2960-S was erroring the ports because PAgP could not be negotiated!! We didn't ask for PAgP in the first place. PAgP is Cisco proprietary and not supported on other vendors switches.

The solution was to set the channel group on the Cisco to 'passive' mode :)

Dell 6224 stack:

interface range ethernet 1/g24,2/g24
channel-group 24 mode auto

Cisco 2960-S:

Interface range gi1/0/47,gi1/0/48
channel-group 1 mode passive

You can check to see if the LAG is passing VLAN trunk with this command on the Cisco 2960-S:

show interface trunk

Inter-vendor switch connectivity issues eh!! This seems to only be the case with 2960's as the 3750's where fine. Thanks to Paul Walton for his troubleshooting.

Thursday, 23 May 2013

Migrating physical RDP mapping to VMDK

According to Cormac Hogan at VMware, you can migrate a physical RDM to VMDK, the only 'gocha' is that the VM must be shutdown to perform the cold migration.i.e. no live Storage vMotion. I needed to do this migrate data from a EMC to EqualLogic array.
http://blogs.vmware.com/vsphere/2012/02/migrating-rdms-and-a-question-for-rdm-users.html

Doing this causes this error at the end of the operation :(

Incompatible device specified for device ’0′

One solution is to clone the disk using vmkfstools, but after the clone you need to remove the RDM and add the cloned VMDK by adding an existing disk to the VM configuration. My test was with a 40GB disk.

You can time the operation, I used this command


time vmkfstools -i /vmfs/volumes/lun1/test-vm/test-vm_1-rdmp.vmdk /vmfs/volumes/lun1/test-vm/test-vm_2.vmdk  -d zeroedthick


Clone: 100% done.
real    7m 54.56s
user    0m 0.63s
sys     0m 0.00s

Tuesday, 7 May 2013

Useful ESXCFG commands

To run any of these commands on you local machine you will need vSphere CLI 5.1 of higher.

https://my.vmware.com/web/vmware/details?downloadGroup=VSP510-VCLI-51U1&productId=285
You will need to change the server address 0.0.0.0 for your ESXi host and also insetr the correct password.

Enter maintenance mode:
vicfg-hostops.pl --server=0.0.0.0 --username root --password "password" --operation enter

Reboot a host:
vicfg-hostops.pl --server=0.0.0.0 --username root --password "password" --operation reboot

Disable DelayedAck:
esxcli --server=0.0.0.0 --username root --password "password" iscsi adapter param set --adapter=vmhba33 --key=DelayedAck --value=false

Set the iSCSI login time out to 60 seconds:
esxcli --server=0.0.0.0 --username root --password "password" iscsi adapter param set -A vmhba33 -k LoginTimeout -v 60

List the values for the SWiSCSI HBA:
esxcli --server=0.0.0.0 --username root --password "password" iscsi adapter param get -A=vmhba33

Find the iQN name of a host:
esxcli --server=0.0.0.0 --username root --password "password" iscsi adapter get -A vmhba33 | find "iqn"

Establish if NetQ is enabled:

esxcli --server=0.0.0.0 --username root --password "password" system settings kernel list | find "netNet"

Find the version of Broadcom driver:
esxcli --server=0.0.0.0 --username root --password "password" system module get -m tg3

List all NICs in a host , like 'esxcfg-nics -l'
esxcli --server=0.0.0.0 --username root --password "password" network nic list

Disable LRO on a host:
esxcli --server=0.0.0.0 --username root --password "password" system settings advanced set -o "/Net/TcpipDefLROEnabled" -i 0


See if LRO is enabled on a host:
esxcli --server=0.0.0.0 --username root --password "password" system settings advanced list -o "/Net/TcpipDefLROEnabled"

Add a time server to a host:
vicfg-ntp.pl --server=0.0.0.0 --username root --password "password" --add 0.uk.pool.ntp.org

Specify a syslog server :
esxcli --server=0.0.0.0 --username root --password "password" system syslog config set --logdir-unique true --loghost=udp://0.0.0.0:514

Install a patch on a host after using SCP to copy it to the path below :
esxcli --server=0.0.0.0 --username root --password "password" software vib install -d /vmfs/volumes/esxiserver/BCM-NetXtremeII-4.0-offline_bundle-862948.zip

Set the PSP to RoundRobin and IOPS to 3 for EqualLogic arrays:
esxcli --server=0.0.0.0 --username root --password "password" storage nmp satp rule add -s "VMW_SATP_EQL" -V "EQLOGIC" -M "100E-00" -P "VMW_PSP_RR" -O "iops=3"

Verify the IOPS have been saved
esxcli --server=172.26.253.185 --username root --password "P@ssw0rd" storage nmp device list | find "iops"

Set the PSP to RoundRobin and IOPS to 1 for other arrays:
esxcli --server=0.0.0.0 --username root --password "password" storage nmp psp roundrobin deviceconfig set -d naa.devicename --iops 1 --type iops

Install a bundle:
esxcli --server=0.0.0.0 --username root --password "password" software vib install -d /vmfs/volumes/esxi01/BCM-NetXtremeII-4.0-offline_bundle-862948.zip

Remember, don't issue these commands if you don't understand what they do!!

Monday, 8 April 2013

Bulk Importing PST files into Exchange 2010


If you have exported all your PSTs from Exchange 2003 with ExMerge you need to import them back into Exchange 2010. This can only be done via PowerShell.

Open Exchange PowerShell with elevated privileges. You will need to change below, the username to your current exchange administrator account.

New-ManagementRoleAssignment –Role “Mailbox Import Export” –User SBSadmin
exit

Open Exchange PowerShell again with elevated privileges and issue this command, this is one long line. You have to use a UNC path. Change server_name with your new Exchange servers name.

Dir \\server_name\d$\*.pst | %{New-MailboxImportRequest -Name ImportOfPst -BatchName ImportPstFiles -AcceptLargeDataLoss -
BadItemLimit unlimited -Mailbox$_.BaseName -FilePath $_.FullName}

You can monitor the progress of the import with this command...
Remember Exchange will only import two PSTs at a time. This can be altered by editing the Exchange config file but you risk overloading your exchange server.

Get-MailboxImportRequest | Get-MailboxImportRequestStatistics | ft TargetAlias,Percent*,BytesTransferred*

Tuesday, 26 March 2013

Hyper-V 3.0 web resources


Thursday, 7 March 2013

Hyper-V 3.0 ReFS

I thought I would be clever and try out the new ReFS file system in Windows 2012. Did some reading and it sounds great. I also used Google to search for resources about using ReFS volumes in Hyper-V clusters, but little was found.

Lesson learn't...as always with M$ all the glistens isn't gold :( 


Hyper-V 3.0 hotfixes

When installing Hyper-v clusters in either Windows 2008r2 SP1 or Windows 2012, it's really important to keep up to date with all the hotfixes. Oddly enough you would think that Windows update would do this. But that's not always the case.

Here is a list of hotfixes from the Cluster team.

http://social.technet.microsoft.com/wiki/contents/articles/15577.list-of-failover-cluster-hotfixes-for-windows-server-2012.aspx
http://blogs.technet.com/b/yongrhee/archive/2011/05/22/list-of-failover-cluster-windows-server-2008-r2-sp1-hotfixes.aspx

Here is a list of hotfixes from the Hyper-V team.

http://social.technet.microsoft.com/wiki/contents/articles/15576.hyper-v-update-list-for-windows-server-2012.aspx

http://social.technet.microsoft.com/wiki/contents/articles/20885.hyper-v-update-list-for-windows-server-2012-r2.aspx

To see if you have a hotfix installed or not you can use this command. In this example I am searching for a hotfixed numbered 2813630 & 2796995

wmic qfe list full | find "2813630"
wmic qfe list full | find "2796995" - ODX hotfix
wmic qfe list full | find "2919355" - Windows 2012 R2 Update


If the return result is blank you don't have it installed.

To list all the hotfixes installed on the system use that command:

wmic qfe list full | find "KB"

Tuesday, 26 February 2013

Running the Hyper-V BPA in Windows 2008r2 core mode

To run the Hyper-V 2.0 BPA in Windows 2008r2 core mode you need to run the following commands from the command line of the core mode installation.


c:\ocsetup ServerManager-PSH-Cmdlets /norestart

c:\ocsetup BestPractices-PSH-Cmdlets /norestart


Start PowerShell


C:\PowerShell

PS C:\import-module ServerManager

PS C:\import-module BestPractices

PS C:\Invoke-BpaModel Microsoft/Windows/Hyper-V

PS C:\Get-BPAResult Microsoft/Windows/Hyper-v


If you want to export the results into a HTML page as a table, use this command instead

Get-BpaResult -BestPracticesModelId Microsoft/Windows/Hyper-V | Where-Object {$_.Severity -eq "Error" -or $_.Severity -eq “Warning” } | ConvertTo-Html -Property Severity,Category,Title,Problem,Impact,Resolution,Help -Title "BPA Report for Hyper-V" -Body "BPA Report for Hyper-V" –Head "" | Out-File "C:\bpa.html"

Friday, 11 January 2013

Slow storage vMotion from VMFS 3 to VMFS 5

I was moving a customer from vSphere 4.1 to 5.1. I have read that it's best to create a new datastore with VMFS 5 and migrate VMs over. The new hosts could see both new and old datastores.
I initiated a Storage vMotion to move a VM from the VMFS 3 to VMFS 5 datastore but it was taking ages. The performance charts where shows approx 17 MB/s. I rechecked my configuration and all was good. I decided to move a VM from a VMFS 5 datastore to another VMFS 5 datastore and this time the throughput was over 117 MB/s

Turns out that because the VMFS3 datastores have a 2MB block size and the VMFS 5 datastores are automatically created with a 1MB block size this slows things right down.

http://www.yellow-bricks.com/2011/02/24/storage-vmotion-performance-difference/ 

So allow plenty of time and be patient when migrating from VMFS 3 datastores :)