Windows 2003 r2
http://en.community.dell.com/techcenter/storage/w/wiki/mpio-to-powervault-md3000i-with-microsoft-iscsi-initiator.aspx
Windows 2008 r2
http://paulgrevink.wordpress.com/2012/02/21/configure-dell-md3000i-mpio-with-windows-2008-r2/
ESXi 4.1
http://i.dell.com/sites/content/shared-content/data-sheets/en/Documents/VMware_ESX_4-1_Deployment_Guide_for_PowerVault_MD32x0i_MD36X0i.pdf
ESXi 5.x
http://i.dell.com/sites/content/shared-content/data-sheets/en/Documents/PowerVault_MD_iSCSI_Deployment_Guide_for_VMware_ESX50_Server_Software.pdf
Array Tuning Best Practices - Dell
http://www.dell.com/downloads/global/products/pvaul/en/powervault-md3200i-performance-tuning-white-paper.pdf
High Performance Storage Tier
http://www.dell.com/downloads/global/products/pvaul/en/high-performance-tier-implementation-guide.pdf
(found under Storage Array - Change - Cache Settings) I'm reading that for sequential workloads, use 32K, and for Random, use 16K. For mixed, try starting at 16K. I believe this can be changed on the fly. I think the default is 4KB.
Friday, 21 December 2012
Thursday, 20 December 2012
VMware NIC performance tuning resources
VMDq on intel 1GbE NIC
http://kb.vmware.com/selfservice/microsites/search.do?language=en_US&cmd=displayKC&externalId=1026094
VMDq on intel 10GbE NIC
http://kb.vmware.com/selfservice/microsites/search.do?language=en_US&cmd=displayKC&externalId=1004278
Netqueue on Broadcom NICs
http://kb.vmware.com/selfservice/microsites/search.do?language=en_US&cmd=displayKC&externalId=2035701
Performance tuning intel cards
http://www.intel.com/support/network/sb/CS-025829.htm
http://www.intel.com/support/network/adapter/pro100/sb/CS-031909.htm
Low virtual network I/O performance with Intel 1Gbps NIC using igb driver
http://kb.vmware.com/selfservice/microsites/search.do?language=en_US&cmd=displayKC&externalId=2018891
http://kb.vmware.com/selfservice/microsites/search.do?language=en_US&cmd=displayKC&externalId=1026094
VMDq on intel 10GbE NIC
http://kb.vmware.com/selfservice/microsites/search.do?language=en_US&cmd=displayKC&externalId=1004278
Netqueue on Broadcom NICs
http://kb.vmware.com/selfservice/microsites/search.do?language=en_US&cmd=displayKC&externalId=2035701
Performance tuning intel cards
http://www.intel.com/support/network/sb/CS-025829.htm
| FAQ: Intel® Ethernet DCB service for iSCSI |
http://www.intel.com/support/network/adapter/pro100/sb/CS-031909.htm
Low virtual network I/O performance with Intel 1Gbps NIC using igb driver
http://kb.vmware.com/selfservice/microsites/search.do?language=en_US&cmd=displayKC&externalId=2018891
Thursday, 13 December 2012
Wednesday, 12 December 2012
Tuesday, 11 December 2012
Allow ICMP though Windows 2008 r2 firewall
By default the Windows 2008 r2 firewall blocks PING / ICMP, this command can used to allow ICMP through the windows firewall via an elevated command prompt.
netsh advfirewall firewall add rule name="All ICMP V4" protocol=icmpv4:any,any dir=in action=allow
netsh advfirewall firewall add rule name="All ICMP V4" protocol=icmpv4:any,any dir=in action=allow
Monday, 3 December 2012
Firmware updates for Dell servers running ESXi
Here are
good step by step video demo of how to apply updates from USC repository
manager and from USB key:
Dell
Repository Manager - Creating a Bootable ISO
If you want
to update all components and don’t have internet access (to access ftp.dell.com) you can download the whole
repository on a USB device.
Updates using USB
with Lifecycle Controller
Friday, 30 November 2012
Dell OMSA LiveCD download for ESX firmware patching
When you need to apply firmware update to a Dell server and the Life Cycle controller isn't playing ball or the server doesn't have a Life Cycle Controller you can download and use the Dell OMSA LiveCD. It's a bit bloaty for a firmware update platform.
http://linux.dell.com/files/openmanage-contributions/
7.1 seems to be the latest.
http://linux.dell.com/files/openmanage-contributions/omsa-71-live/OMSA71-CentOS6-x86_64-LiveDVD.iso
http://linux.dell.com/files/openmanage-contributions/
7.1 seems to be the latest.
http://linux.dell.com/files/openmanage-contributions/omsa-71-live/OMSA71-CentOS6-x86_64-LiveDVD.iso
Tuesday, 20 November 2012
Dell PowerConnect 7024 stack reload time
It took 01:33 for traffic to start flowing over the stack after a reload. Usefull for calculating outages in iSCSI environment.
Tuesday, 6 November 2012
Some thoughts on interrupt moderation
Most 1GbE or 10GbE Network Interface Cards (NICs) support a feature called
interrupt moderation or interrupt throttling, which coalesces interrupts from the NIC
to the host so that the host does not spend all its CPU cycles processing interrupts.
However, for latency-sensitive workloads, the time that the NIC delays the delivery
of an interrupt for a received packet or for a packet that has successfully been sent
on the wire, is time adding to the latency of the workload.
Most NICs also provide a mechanism, usually with the ethtool command, to
disable interrupt coalescing. VMware recommends to disable physical NIC interrupt
moderation on the VMware ESXi™ host as follows:
# ethtool -C vmnicX rx-usecs 0 rx-frames 1 rx-usecs-irq 0 rx-framesirq 0
Where vmnicX is the physical NIC as reported by the ESXi command:
# esxcli network nic list
You can verify that your settings have taken effect by issuing the command:
# ethtool -c vmnicX
Note that although disabling interrupt moderation on physical NICs is extremely
helpful in reducing latency for latency-sensitive virtual machines, it can lead to
some performance penalties for other virtual machines on the ESXi host, as well as
higher CPU utilization to deal with the higher rate of interrupts from the physical
NIC.
Disabling physical NIC interrupt moderation can also defeat the benefits of Large
Receive Offloads (LRO), because some physical NICs (such as Intel 10GbE NICs)
that support LRO in hardware automatically disable it when interrupt moderation is
disabled, and the ESXi implementation of software LRO has fewer packets to
coalesce into larger packets on every interrupt. LRO is an important offload for
driving high throughput for large message transfers at reduced CPU cost, so this
trade off should be considered carefully. Additional details are available in the
knowledge base article, Poor TCP performance can occur in Linux virtual machines
with LRO enabled: kb.vmware.com/kb/1027511.
If the ESX host is restarted the above configurations must be reapplied.
Thursday, 18 October 2012
Tuesday, 16 October 2012
Dell Blade IOM back door console access
There are three ways to manage a Dell Blade switch.
- The good old serial console
- SSH if you have configured the switch with an IP address via method 1.
- SSH to the CMC IP address with putty, teraterm etc.
at the $ prompt type:
$ connect switch-1 - To exit type CTRL+\
Magic console access to the switch for a remote location without a serial connection, great if you assign the wrong VLAN like I did and get cut off from the switch via SSH :P
switch-1 = A1
switch-2 = A2
switch-3 = B1
switch-4 = B2
switch-5 = C1
switch-6 = C2
switch-1 = A1
switch-2 = A2
switch-3 = B1
switch-4 = B2
switch-5 = C1
switch-6 = C2
Wednesday, 3 October 2012
Dell servers stuck at Initializing firmware interfaces...
I have seen a number of 12G Dell servers getting stuck after POST with the message below.

If you leave the server long enough it does move on. I have seem this take 45 minutes!!!
Dell PS are aware of the problem which seems to mainly effect, but not limited to blades with quad port mezz cards.
I have fixed this for one customer by using the lice cycle controller to update all the firmware, but the next site I saw this the firmware didn't work.
The work around seems to be to enter the Life Cycle controller and under the iDRAC setting untick "Collect hardware inventory on boot"
Update: Doing so stops m1000e BIOS profiles from working! Dell state they are having a lot of calls over this and are working towards a fix.
Monday, 1 October 2012
Force10 - % Error: Port is in Layer-2 mode
When you try to configure ports on a Force 10 switch for a LAG the switch throws this error:
To prevent this issue the command
# no switchport
If the no switchport command gives the error below:
% Error: Port has Layer-2 config on it Gi 0/xx
You will need to remove the spanning tree configuration for that port with this command.
#no spanning-tree rstp edge-port
% Error: Port is in Layer-2 mode Gi 0/xx
To prevent this issue the command
# no switchport
If the no switchport command gives the error below:
% Error: Port has Layer-2 config on it Gi 0/xx
You will need to remove the spanning tree configuration for that port with this command.
#no spanning-tree rstp edge-port
Don't forget to save the running config ;)
Wednesday, 26 September 2012
Tuesday, 25 September 2012
Troubleshooting excessive I/O on a LUN in VMware
If you notice a lot of I/O being generated on a particular LUN. How do you figure out who / what is causing this? Well it is not as difficult as you think it would be…
- Open up esxtop
- Go to the “Device” view (U)
- Find the device which is causing a lot of I/O
- Press “e” and enter the “Device ID” in my case that is an NAA identifier so “copy+paste” is easiest here
- Now look up the World ID under the “path/world/partition” column
- Go back to CPU and sort on %USED (press “U”)
- Expand (press “e”) the world that is consuming a lot of CPU, as CPU is needed to drive I/O
Friday, 17 August 2012
EqualLogic Auto-Snapshot Manager Agent fails to start
EqualLogic Auto-Snapshot Manager Agent fails to start on Windows hosts that are not connected to the internet. This happens because the Host Intergration Toolkit 4.0 uses .NET 2.0.
Each time a .NET application starts, it tries to check revoked certificates at crl.microsoft.com because the server has no internet access the service times out while waiting.
The solution is to increase the ServicePipesTimeout value in the registry.
This can also be caused if the installation of the HIT 4.0 fails to install the Microsoft MPIO feature. The solution is to uninstall the HIT, reboot, manually install the MPIO feature and then install the HIT again.
see support.microsoft.com/kb/824344 for further reading.
Each time a .NET application starts, it tries to check revoked certificates at crl.microsoft.com because the server has no internet access the service times out while waiting.
The solution is to increase the ServicePipesTimeout value in the registry.
The Service Control Manager will generate an event if a service does not respond within the defined timeout period (the default timeout period is 30000 milliseconds). To resolve this problem, use the Registry Editor to change the default timeout value for all services.
- In the Registry Editor, click the registry subkeyHKEY_LOCAL_MACHINE\SYSTEM\CurrentControlSet\Control
- In the details pane, locate the ServicesPipeTimeout entry, right-click that entry and then select Modify.Note: If the ServicesPipeTimeout entry does not exist, you must create it by selecting New on the Edit menu, followed by the DWORD Value, then typing ServicesPipeTimeout, and clicking Enter.
- Click Decimal, enter the new timeout value in milliseconds (I prefer 120000), and then click OK.
- Restart the computer.
This can also be caused if the installation of the HIT 4.0 fails to install the Microsoft MPIO feature. The solution is to uninstall the HIT, reboot, manually install the MPIO feature and then install the HIT again.
see support.microsoft.com/kb/824344 for further reading.
Wednesday, 1 August 2012
Converging 10GbE and 1GbE networks with Force 10 and Dell PowerConnect
Customers are now moving from 1GbE iSCSI storage to 10GbE. This introduces a new challenge of converging 1 and 10 networks. In this situation the customer has two existing EqualLogic 1GbE Arrays connected to a pair of Dell PowerConnect 5424 switches, these switches where joined together via a 2Gb LAG. The customer has purchased two new 10Gb Arrays and a pair of Dell Force 10 s4810 switches, but needs to have a period where the existing ESXi servers need to continue accessing the array.
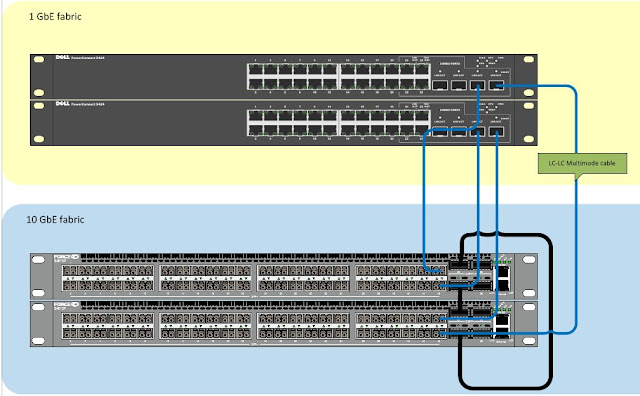
The end solution:

Parts required:
4 x PowerConnect SFP Transceivers, Dell part number 0HHM9W
4 x Force10 SFP Transceivers, Dell part number 0GF76J
4 x LC-LC Multi-mode Optical Cables, depicted in blue above.
Twin-axe cables from the s4810 ports to the SFP combo ports do not work!! The answer is to use a Or if you are using PowerConnect 62xx series you need to use:
Twin-axe cables from the s4810 ports to the SFP combo ports do not work!! The answer is to use a Or if you are using PowerConnect 62xx series you need to use:
1 x Dell PowerConnect 622xx/M6220 Dual Port SFP+ module, Dell Part number 409-10135
2x 10GbE SFP+ Direct Attach copper cable 5M-KIT (Either or) Dell Part number 470-12823
2x 10GbE SFP+ Direct Attach copper cable 2M-KIT (Either or) Dell Part number 470-12822
2x 10GbE SFP+ Direct Attach copper cable 5M-KIT (Either or) Dell Part number 470-12823
2x 10GbE SFP+ Direct Attach copper cable 2M-KIT (Either or) Dell Part number 470-12822
Configuration on both PowerConnect switches:
Break the 2 port LAG between the PowerConnects, insert the SFP modules into to SFP ports 23 and 24 making sure the shared Ethernet ports aren't in use!
#conf
(config)#interface port-channel 1
(config)#desc Force10-link
(config)#port jumbo-frame
(config)#flowcontrol on
(config)#switchport mode trunk
(config)#switchport trunk allowed vlan add 100 (the iSCSI vlan)
#exit
#conf
(config)#internet range ethernet g23-24
(config)#channel-group 1 mode on (Must be ON not auto/active)
On the Force10 switches, update the firmware, stack the switches and issue these commands to create two port channels, two are required because the PowerConnect 5424's can't be stacked:
!
interface Port-channel 1
description "LAG to bottom 5424"
no ip address
mtu 12000
switchport
channel-member TenGigabitEthernet 0/46
channel-member TenGigabitEthernet 1/46
no shutdown
!
interface Port-channel 2
description "LAG to top 5424"
no ip address
mtu 12000
switchport
channel-member TenGigabitEthernet 0/47
channel-member TenGigabitEthernet 1/47
no shutdown
!
Now that the LAG between the 5424 switches and the F10's has been created we need to tell the VLANs that the traffic can pass across the LAG. The Force 10 was configured with two VLANs to match the 5424's, vlan 100 for iSCSI and vlan 101 for vMotion. The lines in bold are in important ones.
!
interface Vlan 100
description iSCSI
name iSCSI
ip address 192.168.10.251/24
tagged Port-channel 1-2
untagged TenGigabitEthernet 0/0-23 (top switch)
untagged TenGigabitEthernet 1/0-23 (bottom switch)
no shutdown
!
interface Vlan 101
description vMotion
name vMotion
ip address 192.168.11.251/24
tagged Port-channel 1-2
untagged TenGigabitEthernet 0/24-31
untagged TenGigabitEthernet 1/24-31
no shutdown
!
Test the LAG by pinging IP addresses on both sets of switches. Don't forget to copy the running-config to startup-config on all the switches. As a note the LAG did not work the first time , I had to remove the channel members with these commands:
no channel-member TenGigabitEthernet 0/46
no channel-member TenGigabitEthernet 0/47
no channel-member TenGigabitEthernet 1/46
no channel-member TenGigabitEthernet 1/47
Once I re-added the ports back the LAG sprang into life! Dell tech said they had seen this before!
Friday, 13 July 2012
Plug N Play errors after firmware updates
After using the Life-cycle controller on a Dell R710 I got this error. Also the server would not boot as it could not find the RAID controller.

The fix was to disable the ROM option, highlighted below for all non on-board Broadcom NICs. In my case there where eight to configure as there where 2 quad port PCI-e cards.

Tuesday, 26 June 2012
iSCSI Throughput and SMB signing
Here is an interesting article on the effects of SBM signing on iSCSI targets.

Basically it involves, disabling SMB signing on client and server communications to speed up network throughput.
http://www.thatcouldbeaproblem.com/?p=72

http://www.thatcouldbeaproblem.com/?p=72
Monday, 28 May 2012
Remove the Exchange 2010 default Mailbox store
The First database contains the SystemMailboxes which are the Arbitration mailbox(es).
We have to move these system mailboxes to another database before of remove the Default Database.
1. Find the Arbitration Mailbox using the Exchange MAnagement Shell (EMS):
Get-Mailbox | Where {$_.Name -like "Discovery*" } | ft Name
You might need to move the Federation Mailbox also...
Get-Mailbox -Arbitration | ft Name
2. Now create a new move request in order to move the system mailboxes to another mailbox database:
New-MoveRequest -Identity "SystemMailbox{yourGUID}" -TargetDatabase "dbxxxx"
New-MoveRequest -Identity "DiscoverySearchMailbox{yourGUID}" -TargetDatabase "dbxxxx"
New-MoveRequest -Identity "FederatedMail{yourGUID}" -TargetDatabase "dbxxxx"
3. Verify whether the move request completed:
Get-MoveRequest
4. Now remove the move request
Or clear the lot...Remove-MoveRequest -Identity "the name of the request like Microsoft Exchange Approval Assistant"
Edit: For Exchange 2016 you can use these commands:Get-MoveRequest | Remove-MoveRequest
Get-Mailbox -Arbitration | New-MoveRequest -TargetDatabase "dbxxxxxxx"
Get-Mailbox | Where {$_.Name -like "Discovery*" } | New-MoveRequest -TargetDatabase "dbxxxxxxx"
Get-Mailbox -Database "Mailbox Database Old" -AuditLog | New-MoveRequest -TargetDatabase "dbxxxxxxx"
Get-Mailbox -Database "Mailbox Database Old" | New-MoveRequest -TargetDatabase "dbxxxxxxx"
Saturday, 12 May 2012
Friday, 20 April 2012
ESXi 5 EqualLogic best practices.
If you are using Raw Device Mapped (RDM) disks in your VM's, make sure the pathing for that is changed to RR and IOPs 3 as well. (MEM would also set this connections up properly as well)
Other common tweaks are disable DelayedACK (its in the iSCSI initiator properties) and disable Large Receive Offload (LRO)
Within VMware, the following command will query the current LRO value.
# esxcfg-advcfg -g /Net/TcpipDefLROEnabled
To set the LRO value to zero (disabled):
# esxcfg-advcfg -s 0 /Net/TcpipDefLROEnabled
NOTE: a server reboot is required.
Info on changing LRO in the Guest network.
ESXI v5.0 should also have the Login Timeout changed to 60 seconds. (default is 5). However, you have to be at build 514841 or better.
See VMware KB 2007680 kb.vmware.com/.../2007680
One more common enhancement that gets missed often is creating a virtualized SCSI adapter for each VMDK (or RDM) in each VM. (Up to 4x controllers) If you look in the VM settings, each VMDK/RDM shows a "Virtual node"
It will say 0:0, for first drive, then 0:1, 0:2, etc... Shutdown the VM, change the other VMDK/RDMs from 0:1 to 1:0, then 0:2 to 2:0 and so on. This will tell ESX to create new SCSI controllers for each disk. Really helps with Exchange/SQL/Sharepoint. Things that have databases and logs or fileservers that have multiple VMDKs/RDMs
*************************************************************************************
*** Script to change EQL volumes to RR and set the IOPs to 3 in ESXi v5.0. ****
*************************************************************************************
This is a script you can run to set all EQL volumes to Round Robin and set the IOPs value to 3. (Datastores and RDMs)
#esxcli storage nmp satp set --default-psp=VMW_PSP_RR --satp=VMW_SATP_EQL ; for i in `esxcli storage nmp device list | grep EQLOGIC|awk '{print $7}'|sed 's/(//g'|sed 's/)//g'` ; do esxcli storage nmp device set -d $i --psp=VMW_PSP_RR ; esxcli storage nmp psp roundrobin deviceconfig set -d $i -I 3 -t iops ; done
After you run the script you should verify that the changes took effect.
#esxcli storage nmp device list
Thursday, 12 April 2012
Equallogic ASM/ME - Replication partner Not Available
ASM/ME reports Replication Partner Not Available. Even though manual replication works.

UPDATE. - Workaround from Dell PS.
Highlight the VSS-Control Volume and click connect you get an Advance button, Click it and you will get a pop up window and you should see your chap credentials there.
Enter you chap Credentials on both the hosts and that should resolve the issue.

Wednesday, 4 April 2012
Optimal iSCSI NIC settings
This can help eliminate TCP retransmits between EQL and the host.Find the 2x iSCSI NICs in the registry, only change this for NICs connecting to iSCSI storage.
HKEY_LOCAL_MACHINE\SYSTEM\CurrentControlSet\Services\Tcpip\Parameters\Interfaces
Create two new DWORDS
TcpAckFrequency = 1
TcpDelAckTicks = 0
HKEY_LOCAL_MACHINE\SYSTEM\CurrentControlSet\Services\Tcpip\Parameters\Interfaces
Create two new DWORDS
TcpAckFrequency = 1
TcpDelAckTicks = 0
Restart the server.
Enable TSO and LRO on the NIC if you have the option, VMXNET3 can do this.
http://support.microsoft.com/kb/328890
http://support.microsoft.com/kb/2020559
http://smallvoid.com/article/winnt-nagle-algorithm.html
http://support.microsoft.com/kb/328890
http://support.microsoft.com/kb/2020559
http://smallvoid.com/article/winnt-nagle-algorithm.html
Tuesday, 3 April 2012
Dell Life cycle controller crashes with Hardware Exeception
When you press F10 to access the Dell Life Cycle controller it crashes with this error.
!!!! x64 exception type - 00000000000000000000000D !!!!
This happened to me after using the life cycle controller to update all the firmware within the server.
The solution
!!!! x64 exception type - 00000000000000000000000D !!!!
This happened to me after using the life cycle controller to update all the firmware within the server.
The solution
- Download the Life cycle controller repair package.http://www.dell.com/support/drivers/us/en/04/DriverDetails/DriverFileFormats?DriverId=257NM&FileId=2731104259&productCode=poweredge-r710&urlProductCode=False
- Access to web interface of the iDRAC either the express or enterprise. Find the UPDATE tab and upload the .usc file downloaded from the link above.
Monday, 26 March 2012
vCenter server service won't start event id 1000
I was at a customer the other day. We needed to reboot the VC VM the customer hadn't done this in ages, and typically , after the reboot the vCenter server service wouldn't start, I check the eventvwr and found event id 1000. After some Googling I would appear that something was already running on port 80. I checked the VPXA logs in this location %ALLUSERSPROFILE%\Application Data\VMware\VMware VirtualCenter\Logs\ and found this error:
[VpxdReverseProxy] Failed to create http proxy: Resource is already in use: Listen socket: :80
Futher Googling suggested either IIS has been installed, or the SQL reporting service was installed. Some reports suggest that WinRM takes port 80 but this was later found to be incorrect.
I even tried upgrading the customer the vCenter 4.1 U2 this still did not work.
NETSTAT -ANO reported that java.exe was taking the port so I presumed that Tomcat was stuffed.
Fix: In the end I thought I would stop some services to see if that was the cause. Sure enough when I stopped VMware Update Manager, port 80 was then free. I set the VUM service to delayed start and this sorted the issue. A couple of reboots proved this worked! What I can't work out is that know one else had blogged this issue.
Troubleshooting.
http://kb.vmware.com/selfservice/microsites/search.do?language=en_US&cmd=displayKC&externalId=1015101
http://kb.vmware.com/selfservice/microsites/search.do?language=en_US&cmd=displayKC&externalId=1003971
IOP values for harddisks
| Device | Type | IOPS | Interface | Notes |
| 5,400 rpm SATA drives | HDD | 50-80 IOPS | SATA 3 Gb/s | |
| 7,200 rpm SATA drives | HDD | 75-100 IOPS | SATA 3 Gb/s | |
| 10,000 rpm SATA drives | HDD | 125-150 IOPS | SATA 3 Gb/s | |
| 10,000 rpm SAS drives | HDD | 140 IOPS | SAS | SAS is full duplex |
| 15,000 rpm SAS drives | HDD | 175-210 IOPS | SAS | SAS is full duplex |
In a mirrored configuration:
Disk IOPS = Read IOPS + (2 * Write IOPS)
In a parity (RAID5) configuration:
Disk IOPS = Read IOPS + (4 * Write IOPS)
Example calculations
Now let's look at an example. If you estimate that you need to support 40 Read IOPS (40 reads/sec) and 80 Write IOPS (80 writes/sec).
If you want to use a mirrored configuration of drives:
Disk IOPS = Read IOPS + (2 * Write IOPS) = 40r/s + (2 * 80w/s) = 200 Disk IOPSUsing 7200 rpm drives, you need: 200 / 50 = 4 disk drives
Using 10k rpm drives, you need: 200 / 130 = 2 disk drives (always round up)
If you want to use a parity (RAID5) configuration of drives:
Disk IOPS = Read IOPS + (4 * Write IOPS) = 40r/s + (4 * 80w/s) = 360 Disk IOPSUsing 7200 rpm drives, you need: 360 / 50 = 8 disk drives (always round up)
Using 10k rpm drives, you need: 360 / 130 = 3 disk drives
An excellent article on how how RAID levels effect IOPS
http://skabelka.com/node/125
http://sudrsn.wordpress.com/2010/12/25/iops-raid-penalty-and-workload-characterization/
Monday, 27 February 2012
Network I/O Latency on VMware vSphere 5
A good article on understanding and troubleshooting network latency in vSphere 5.0
http://www.vmware.com/files/pdf/techpaper/network-io-latency-perf-vsphere5.pdf
http://www.vmware.com/files/pdf/techpaper/network-io-latency-perf-vsphere5.pdf
Wednesday, 22 February 2012
vSphere 5 Networking Bug Affects Software iSCSI
I have been hit by this issue a few times how, and doubted my skills thinking such a fundamental bug would not exist in VMware vSphere 5
Incorrect NIC failback occurs when an unused uplink is present
Joshua Townsend has blogged about this.
http://vmtoday.com/2012/02/vsphere-5-networking-bug-affects-software-iscsi/
Incorrect NIC failback occurs when an unused uplink is present
Joshua Townsend has blogged about this.
http://vmtoday.com/2012/02/vsphere-5-networking-bug-affects-software-iscsi/
Monday, 20 February 2012
Friday, 27 January 2012
Dell UPS shut down software for ESXi installations
Looks like Dell have finally sorted out the UPS shut down software for ESXi and vCenter.
Quick guide:
Download the software from the link below. Install the MUMC on the vCenter server if it's physical. Open the web console. Default username admin password admin
Under system and 'edit module settings' enable Virtualization.


Software download:
http://www.dell.com/support/drivers/us/en/19/driverdetails?driverid=NFF2Y
User guide:
http://www.dellups.com/pdf/Dell-TIN-UPS003_VMware_vCenter_Shutdown_Scenarios-10-11-12.pdf
YouTube guide:
http://www.youtube.com/watch?v=ZH5M-A465Eg
Old software :(
http://www.dell.com/support/drivers/us/en/555/DriverDetails/DriverFileFormats?c=us&l=en&s=biz&cs=555&DriverId=R318771
Quick guide:
Download the software from the link below. Install the MUMC on the vCenter server if it's physical. Open the web console. Default username admin password admin
Under system and 'edit module settings' enable Virtualization.
After the new virtaulization submenu appears you can add the vCenter instance.
You should now see a new tab in vSphere client when you click on vCenter instance at the top of the tree.

Software download:
http://www.dell.com/support/drivers/us/en/19/driverdetails?driverid=NFF2Y
User guide:
http://www.dellups.com/pdf/Dell-TIN-UPS003_VMware_vCenter_Shutdown_Scenarios-10-11-12.pdf
YouTube guide:
http://www.youtube.com/watch?v=ZH5M-A465Eg
Old software :(
http://www.dell.com/support/drivers/us/en/555/DriverDetails/DriverFileFormats?c=us&l=en&s=biz&cs=555&DriverId=R318771
Tuesday, 24 January 2012
OpenManage Support for VMware ESXi 5.0
This page outlines OPENMANAGE SUPPORT FOR VMWARE ESXi 5.0 / vSphere v5.0
(Updated 12/12/2011)
(Updated 12/12/2011)
Dell OpenManage Server Administrator agent officially supports vSphere v5.0 / ESXi 5 as of December 2011, starting with OMSA 6.5 A02.
Dell uses VMware's VIB mechanism to load the Dell OpenManage Server Administrator (OMSA) monitoring agent into ESXi. To complete the install, you will need to download the OpenManage 6.5 A02 OMSA vCenter Install Bundle (VIB).
For instructions on how to install OpenManage Server Administrator 6.5 A02 on VMware ESXi, refer to theOpenManage 6.5 Server Administrator A02 ESXi 5.0 Tech Sheet.
For full documentation and support information about OpenManage and ESXi 5, visit the OpenManage 6.5 Server Administrator A02 Documentation page.
Monitoring Consoles
The OpenManage Essentials console allows you to monitor your ESXi5.0 systems in a one to many fashion. For more information about OME, visit www.delltechcenter.com/OME.
If you are interested in using the VMware vSphere console for managing your physical and virtual servers, consult the Dell TechCenter page outlining the Dell Management Plug-in for VMware vCenter.
Legacy Info:
Prior to December 2011, OMSA 6.5 A01 only partially supported ESX5i with caveats. Historical information is avalable in this document that outlined limited Dell OpenManage 6.5 A01 support of ESXi 5 . The content is provided “as is” and without express or implied warranties of any kind.
http://www.virtuallifestyle.nl/2011/07/dell-management-plug-in-for-vmware-vcenter-pt-1/
Download URL: http://www.dell.com/support/drivers/us/en/usgen1/DriverDetails/DriverFileFormats?DriverId=R306658
Tuesday, 17 January 2012
.NET bases applications are slow to load or certain in-app tasks are slow
This behaviour will occur with any .NET 1.1 and 2.0 assembly that is authenticode-signed, not only Measurement Studio assemblies. Digital signing is also referred to as code signing. Code signing a .NET library is strongly recommended by Microsoft, and Measurement Studio signs all of our ActiveX and .NET components.
Code signing of assemblies makes components tamper-proof and ensures that you know the identity of the component publisher.
The reason why this problem is occurring is because of the mechanism used by the .NET Common Language Runtime (CLR) to verify code-signed .NET assemblies. Part of the verification process requires an online look-up to check whether the certificate with which the assembly is signed has been revoked and is no longer valid. Windows does this by downloading a CRL (Certificate Revocation List). The first time a code-signed assembly is loaded by the .NET CLR, the CRL is downloaded from the certificate provider's server and cached on the system.
When the .NET CLR loads a code-signed assembly and is unable to reach the CRL distribution point, it records the failure as an inability to provide the assembly evidence that it was code-signed. So the assembly is allowed to load, but is not marked as being digitally signed. There is a 15 second delay for CRL retrievals. This is how long the CLR will keep on re-trying to download the CRL before it finally times out. So the delay in loading the .NET assembly occurs because Windows is unable to download the CRL and keeps trying to download it for 15 seconds before timing out.
This behavior is by design.
The .NET CLR will not indicate any error or throw any security exception when verifying a signed assembly if the CRL distribution point cannot be reached. An error here from WinVerifyTrust(), the API used by the .NET CLR to verify a code signed assembly, prevents the assembly from being marked as code signed. Note that this does not apply to assemblies loaded thru the Internet Explorer hosting interface.
You could manually download the CRL and install it on your system. But the CRL is valid only for 10-15 days, so unless your system is able to update the file after this time, you will run into the same problem again.
Microsoft recommends disabling CRL checking as a workaround by disabling this option in Internet Explorer. Use the following steps to disable the CRL checking in Internet Explorer:
- Select Start»Control Panel.
- Double-click Internet Options.
- Select the Advanced tab.
- In the Security section, uncheck the Check for publisher's certificate revocation option.
By disabling the CRL checking using the Internet Options, you are not exposing yourself to a security threat because this check is not working. The reason why this problem is showing up is because your network settings are not allowing Windows to access the CRL.
In addition, it is possible to programmatically set the CRL verification. When the Check for publisher's certificate revocation is unchecked, a setting in the registry is changed. To turn off CRL verification, set HKCU\Software\Microsoft\Windows\CurrentVersion\WinTrust\Trust Providers\Software Publishing\State from 0x00023c00 to 0x00023e00. To turn CRL Checking on again, reset the State key to 0x00023c00
In addition, it is possible to programmatically set the CRL verification. When the Check for publisher's certificate revocation is unchecked, a setting in the registry is changed. To turn off CRL verification, set HKCU\Software\Microsoft\Windows\CurrentVersion\WinTrust\Trust Providers\Software Publishing\State from 0x00023c00 to 0x00023e00. To turn CRL Checking on again, reset the State key to 0x00023c00
Subscribe to:
Posts (Atom)